Remodeling your home doesn’t have to break the bank, especially when it comes to updating outdated ceramic tile floors. Whether you’re looking to refresh a laundry room, bathroom, or any other area in your home, painting and stenciling ceramic tile is an affordable and creative solution. With just a few supplies and a weekend of work, you can give your floors a stylish new look for less than $75. This comprehensive step-by-step guide will walk you through the entire process, from preparation to the final protective finish, ensuring that your DIY project is both fun and successful. Say goodbye to old, dirty tiles and hello to a fresh, modern floor that looks like it cost a fortune.
Materials and Preparation
Before diving into your tile transformation, gathering the right materials and properly preparing the surface are crucial steps to ensure a long-lasting finish. Here’s what you’ll need:
- Orbital sander fitted with 150-grit sandpaper
- Liquid sandpaper or TSP pre-paint cleaner
- Painter’s tape
- Angle brush
- 9″ paint roller & tray
- Zinsser Bulls Eye 1-2-3 Primer
- Water-based, semi-gloss exterior paint
- 12″ geometric tile stencil
- (2) 4″ mini foam roller & paint tray
- Precision paint brush
- Water-based polyurethane, satin finish
Start by creating a digital mood board using Pinterest, an image collage app, or screenshots on your phone. This will help you visualize how the patterns and colors will look together. When you visit the paint store, use your mood board to compare paint samples and select the perfect shades.
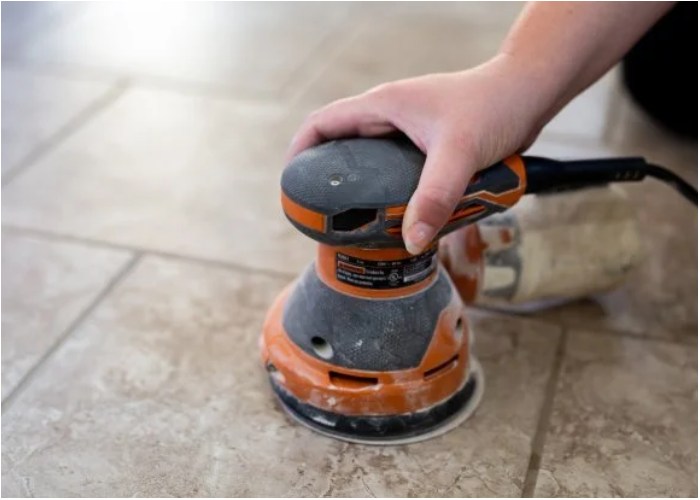
Step 1: Prep The Tiles
Proper preparation is key to a successful and long-lasting paint job. Start by sanding the tile with an orbital sander outfitted with 150-grit sandpaper. This step is crucial as it removes any stuck-on dirt, mud, or paint, and provides a rough surface for the primer to adhere to. After sanding, thoroughly sweep and vacuum the floor to remove all dust and debris.
Next, scrub the tile with liquid sandpaper or a pre-paint cleaner like TSP using a lint-free cloth. This will ensure that the surface is clean and ready for painting. After cleaning, steam mop the floor and let it dry completely. Finally, do one last sweep or vacuum to ensure that every speck of dirt is gone. Proper cleaning and preparation are the foundation of a successful tile makeover.
Step 2: Prime and Paint
Once the floor is fully prepped and dry, it’s time to start painting. First, apply painter’s tape along the baseboards or remove them entirely for a clean finish. Begin by applying a coat of Zinsser Bulls Eye 1-2-3 Primer using a 9-inch roller, making sure to cover the entire surface, including grout lines. This primer is mold and mildew resistant, making it ideal for areas like bathrooms and laundry rooms. Use an angled brush to carefully apply primer along the edges and in corners. Allow the primer to dry for about 35 minutes, then apply two more coats, with about an hour of drying time between each coat.
After the primer has dried completely, it’s time to apply the floor paint. A water-based, semi-gloss exterior paint is recommended for its durability and resistance to peeling, chipping, and staining. Just as you did with the primer, use a clean 9-inch roller and an angled brush to apply three coats of paint, allowing an hour of dry time between each coat. Once the final coat is applied, let the paint cure overnight before proceeding to the next step.
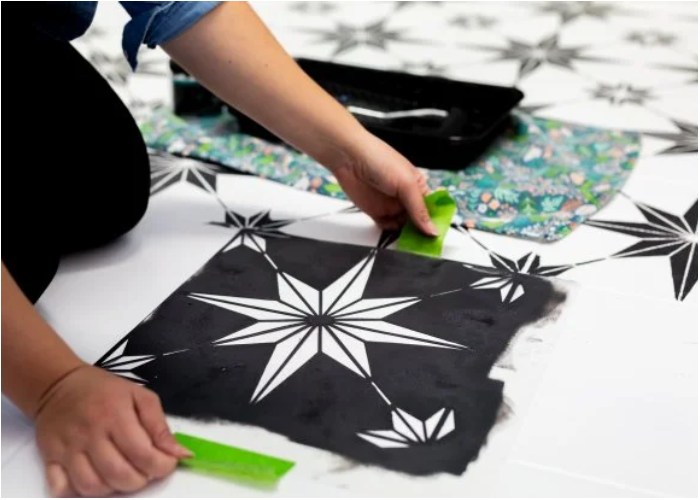
Step 3: Stencil the Tile
Now for the fun part—stenciling! Choose a stencil that matches the size of your tile. If you have 12″x12″ tiles, select a 12″x12″ stencil. Begin by lining up the stencil with the grout lines and securing it with painter’s tape. Pour a small amount of contrasting paint color into a tray and dip your 4-inch foam roller into the paint. Be sure to offload any excess paint onto the roll-off area of the tray—less is more when it comes to stenciling to prevent bleeding.
Firmly and evenly roll the paint over the stencil, then carefully peel it back to reveal your design. If any paint bleeds through to the back of the stencil, wipe it clean before moving on to the next tile. Continue stenciling each tile, using the stencil’s guides to ensure proper alignment. For tiles near walls or corners, you may need to cut the stencil to fit. This step requires patience, but the results are worth it.
Step 4: Finishing Touches and Sealing
Once all the stenciling is complete and the paint has dried, inspect your work for any touch-ups. Use a precision brush to clean up any edges or correct any minor mistakes for a crisp, professional finish. After the touch-ups are dry, it’s time to seal the floor with two coats of satin Minwax Polycrylic. This water-based polyurethane is dust-resistant and scrubbable, making it perfect for high-traffic areas like bathrooms and laundry rooms.
Allow the first coat to dry before applying the second, and give the floor 72 hours to fully cure before moving furniture back into the room. When moving heavy items, use furniture pads or cloths to avoid scratching or damaging your newly painted floor.

Final Look
Updating ceramic tile with paint and stencils is an excellent way to refresh your space without the hassle and expense of a full renovation. By following these detailed steps, you can achieve a stylish and durable finish that will breathe new life into your home. Whether you’re a seasoned DIY enthusiast or a beginner, this project is both achievable and rewarding, offering a high-impact transformation on a modest budget. Gather your supplies, set aside a weekend, and get ready to create a stunning new look for your floors that rivals the beauty of custom, hand-painted tiles.