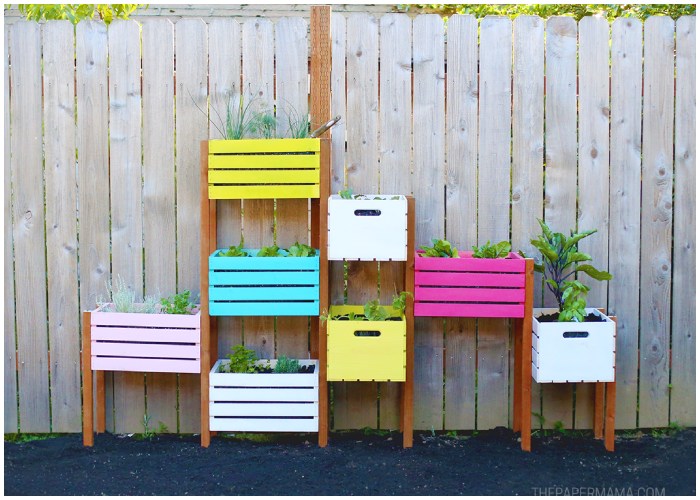
If you’re dealing with a small backyard and free-range chickens that love munching on every plant they find, a vertical rainbow garden is a vibrant and practical solution. This project not only adds greenery to your space but also brings a pop of color that can transform a plain yard into a lively oasis. Building a vertical garden is easy, requires minimal tools, and is ideal for maximizing a limited area. Follow this step-by-step guide to create your own vertical garden, complete with colorful crates and fresh vegetables that are mostly safe from curious chickens.
Materials You’ll Need
Before you start building, gather these supplies:
- 8 wooden crates – Craft stores like Michaels usually have crates suitable for this project.
- Outdoor spray paint in various colors – Look for weather-resistant options; Rust-oleum is a great choice.
- Clear acrylic spray sealer – This protects the paint from the elements, helping your garden last longer.
- 4 treated lumber posts (2″ x 2″ x 8′) – Actual size is 1.5″ x 1.5″ x 8′. You’ll use these for the structure.
- Exterior wood screws (1 3/4″) – About 64 screws are needed for this project.
- Landscape fabric – Helps keep the soil in place within each crate.
- Potting soil and plants – Choose vegetables or flowers you’d like to grow vertically.
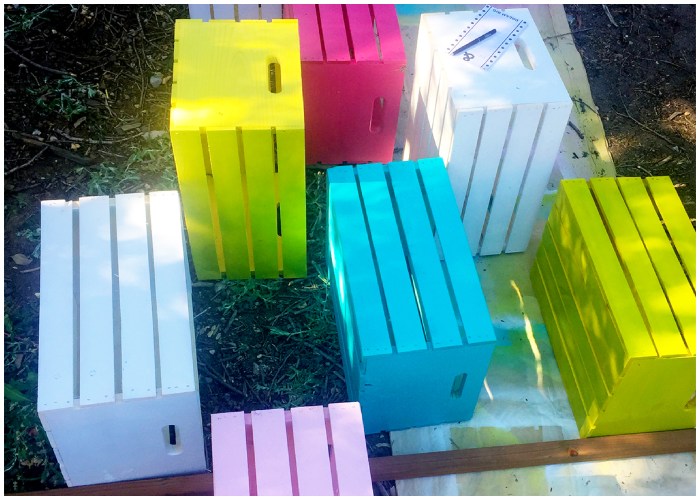
Step 1: Paint Your Crates
Start by painting the crates to add the “rainbow” to your vertical garden. Set up your workspace in a well-ventilated area (ideally outdoors) and wear a mask for safety. Follow these steps:
- Choose Your Colors: Pick a range of bright colors for a cheerful garden display. Each crate can be painted in a different shade to create a rainbow effect.
- Apply the Paint: Only paint the outside of the crates to prevent chemicals from leaching into the soil. Follow the directions on the spray paint can to ensure even coverage.
- Let It Dry: Allow each crate to dry fully before handling to avoid smudges.
Once your crates are dry, use a clear acrylic spray to seal the paint. This extra step will make the crates more weather-resistant, preserving their color and quality for a longer time outdoors.
Step 2: Plan Your Garden Layout
The next step involves planning the layout of your garden. Here’s how to do it:
- Decide on the Arrangement: Think about which plants you’ll be growing and how much space they need. For example, climbing plants may need higher placement, while ground-cover plants can sit lower.
- Consider Sunlight and Watering Needs: Certain plants need more sunlight than others. Place sun-loving plants in the upper crates and shade-tolerant ones lower in the structure.
- Arrange the Colors: Arrange the crates in an order that complements your backyard decor. For instance, a rainbow gradient can look striking against a neutral fence.
Step 3: Cut the Lumber Posts
Now it’s time to cut the posts that will support your crates vertically. Here’s how to approach this step:
- Measure Carefully: Measure each post according to the desired height of your vertical garden. To keep the crates off the ground, add about 3 inches to the total length of each post.
- Cut the Posts: Use a saw to cut the posts to length. If you don’t have a saw, most hardware stores will cut the posts for you if you provide the measurements.
- Prepare for Assembly: Lay out the posts near your planned garden location to make assembly easier.
Step 4: Assemble the Vertical Garden
Attaching the posts to the crates forms the structure of your vertical garden. Follow these steps:
- Align the Crates with the Posts: Position each crate at its designated height along the posts.
- Screw in the Crates: Using exterior wood screws, secure the crates to the posts. Attach the screws from the sides of each crate into the posts for a sturdy hold.
- Check Stability: Make sure each crate is firmly attached, as this ensures the garden can stand tall without wobbling.
Step 5: Add Landscape Fabric to Each Crate
The landscape fabric will prevent soil from spilling out of the crates while still allowing water to drain. Here’s what to do:
- Measure the Inside of Each Crate: Use these dimensions to cut the fabric.
- Line Each Crate: Place a cut piece of landscape fabric inside each crate, covering the bottom and sides. Trim any excess fabric for a clean fit.
- Secure the Fabric: If necessary, use small clips or staples to hold the fabric in place.
Step 6: Fill the Crates with Soil and Plant Your Garden
Now that the crates are ready, it’s time to bring in the soil and plants.
- Add Potting Soil: Fill each crate with potting soil, packing it evenly to support the plants.
- Choose Your Plants: Plant vegetables, herbs, or flowers according to your original layout. Remember to consider each plant’s sunlight and water needs.
- Finish with Watering: Give your new garden a thorough watering to help the plants settle.
Step 7: Secure Your Vertical Garden
Since the vertical garden is tall and narrow, consider securing it to a sturdy structure, like a fence, to prevent tipping. This is especially important in areas with high winds.