Maximizing garage space through effective storage solutions not only helps keep your space organized but also frees up valuable floor space for other uses, like parking vehicles and storing large equipment. Building overhead garage storage is a practical solution for utilizing wasted space. This guide provides detailed instructions for constructing a sturdy overhead storage system using basic materials and tools.
Materials and Supplies:
- Framing Wood: Strong support for the structure.
- Steel Pipe: Durable rods from the plumbing department for holding items.
- Construction Screws: For assembling and securing wood frames.
- Lag Bolts and Washers: For attaching the structure securely to wall studs.
- PVC Pipe: To cover steel pipes, facilitating smooth movement and protection.
- Optional Paint: To finish the wood frames for aesthetic purposes and additional protection.
- Tape Measure: Essential for accurate measurement.
- Saw: To cut wood to the required lengths.
- Pipe Cutter: For cutting steel pipes to size.
- Drill and Bits: For making holes in wood and walls for screws and bolts.
- Driver and Ratchet Set: To drive screws and tighten bolts.
- Level: To ensure all parts of the storage are perfectly horizontal.
Step 1: Measuring and Planning
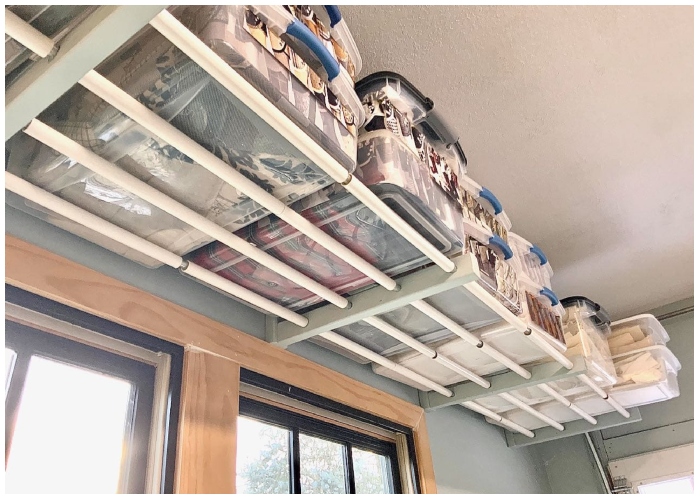
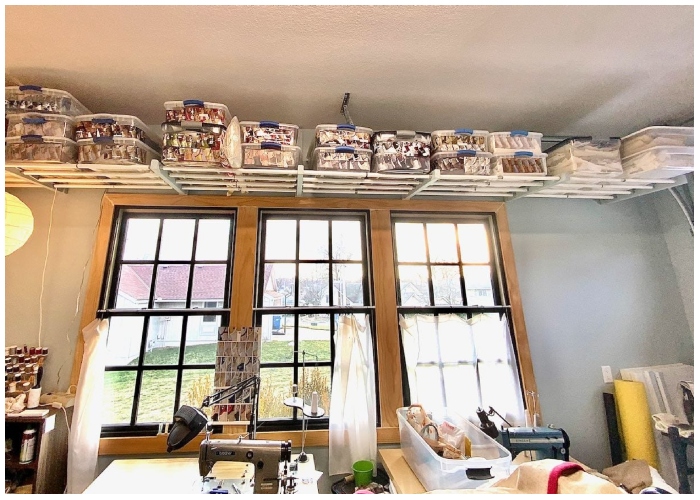
Start by measuring the garage space where the storage will be installed as well as the items you intend to store overhead. This particular storage design accommodates twelve stacks of storage tubs beneath the curve of an overhead door track. It’s crucial to use a stud finder to accurately locate the wall studs where the brackets will be mounted. Plan the placement of brackets so that they align with the wall studs and are spaced appropriately to fit the storage tubs with additional wiggle room for easy access.
Step 2: Cutting and Assembling Brackets
Decide on the dimensions of your storage based on what you will store and the layout of your garage. For example, the brackets in this project were made 24 x 24 inches with 36 inches between centers. This may vary based on ceiling height and storage content. Cut wood for horizontal, vertical, and diagonal supports for the brackets. Using a jig, drill holes in the horizontal pieces for the steel pipes, ensuring precise alignment. Remember, the end brackets should have holes only partially drilled to firmly anchor the steel pipes.
Step 3: Assembling the Overhead Structure
Install the first bracket at the end of the garage furthest from the door. Continue installing each bracket in sequence, ensuring each is properly aligned using a steel pipe as a guide. Slide the steel rods through the brackets, placing PVC pipe sleeves between each bracket. These sleeves allow for easy sliding and prevent the steel pipes from wearing out.
Step 4: Securing and Final Adjustments
Secure each bracket with construction screws and lag bolts into the wall studs. If attaching to masonry walls, use appropriate masonry screws and wall plugs. In timber stud walls, use a stud detector to locate studs and secure with suitable nails or screws. For metal studs, specialized metal screws may be necessary. Optionally, apply gap-filling adhesive for additional stability, especially if the wall surface is uneven.
Step 5: Completing the Installation
Once all brackets and rods are in place, check the entire assembly with a level to ensure everything is straight and well-aligned. Make adjustments as necessary before securing everything in place. Optionally, paint the wood parts of your storage system to match your garage or to protect the wood.
Step 6: Using the Storage
Organize your items on the overhead storage by placing them in storage tubs or directly on the PVC-covered steel pipes. Arrange items based on frequency of use, with less frequently used items placed further back.
Maintenance Tips:
- Regularly check and tighten any loose screws or bolts.
- Inspect the PVC sleeves for wear and replace if necessary to ensure smooth operation.
- Keep the storage area clean and free from dust and debris to prolong the life of the materials.
Building your overhead garage storage is not only a practical project but also a rewarding one that can significantly enhance the functionality and organization of your garage. By following these detailed steps, you can ensure a successful installation that provides ample storage space while keeping your garage tidy and organized.