Stenciling concrete is a unique and fun way to add personality and charm to your outdoor spaces. Last summer, I transformed cinder blocks into stylish outdoor vases using a plaid stencil from Stencil1. Inspired by a similar project in the May issue of Country Living magazine, I decided to stencil some concrete stepping stones for our backyard. Using Stencil1’s latest stencil designs in collaboration with Plaid Crafts, I created colorful and whimsical stepping stones that brighten up our garden path. This simple DIY project is not only affordable but also quick to complete, making it a perfect weekend activity.
The Inspiration Behind the Project
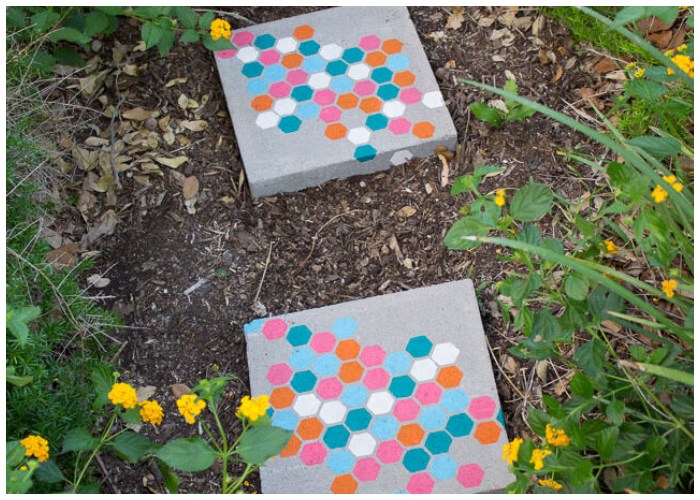
The idea for stenciled garden stepping stones came from a desire to add a touch of creativity to our backyard. These stones lead to a fountain, allowing us to walk barefoot without worrying about where we’re stepping. The bright colors and fun patterns add an unexpected dose of color and playfulness to the yard. If you have a garden or a landscaped area, why not try adding some crafty stepping stones? With pavers costing just over $1 each, you can create these beautiful stones in just over an hour.
Supplies for Stenciled Stepping Stones
To get started on this project, you’ll need the following supplies:
- Stencil1 Honey Bee stencil
- Concrete pavers (available at Lowes for $1.30 each)
- Weather-resistant acrylic craft paints (Plaid’s FolkArt multi-surface paints in Teal, Parchment, Pink Melon, Pure Orange, and Ocean Blue)
- Foam brushes
- Painter’s tape
How to Make Stenciled Stepping Stones
Step 1: Positioning the Stencil
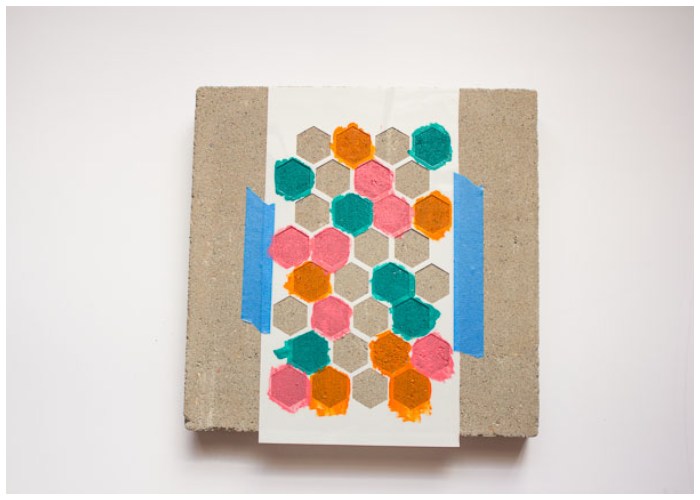
Begin by placing your stencil in the middle of the stone and securing it with painter’s tape. This will keep the stencil in place while you apply the paint. Using a foam brush, apply one color at a time around the stencil. Ensure the paint is applied evenly and carefully to avoid any smudging.
Step 2: Applying the Paint
The gaps between the honeycomb patterns are quite narrow, so take care when using multiple colors. Use the tip of your foam brush for precision around the edges. If colors overlap, you can touch them up afterward. For a quicker and simpler project, consider using a single color for the entire stencil.
Step 3: Repositioning the Stencil
Once the paint has dried (which takes only a few minutes on concrete), wipe off any excess paint from the back of the stencil with a damp rag or paper towel. Reposition the stencil slightly to the side, aligning it with some of the previously painted areas. Fill in some of the holes again to create a layered effect. Repeat this process for the top section of the stone, adding a few patterns along the sides to give the design a dynamic, flowing look.
Step 4: Setting Out the Stones
After completing the stenciling, set the stones out in your garden. They will add a charming and practical element to your landscaping. Over time, the paint may fade slightly, but they will maintain their vibrant look for at least one season. You can always repaint them or try a new design next year.
Conclusion
Creating stenciled garden stepping stones is an easy and inexpensive way to enhance your outdoor spaces. This project allows you to express your creativity while adding a functional and decorative element to your garden. With just a few supplies and a little time, you can transform plain concrete pavers into beautiful works of art. Enjoy the process and the delightful results as you walk barefoot through your colorful, stenciled garden path.