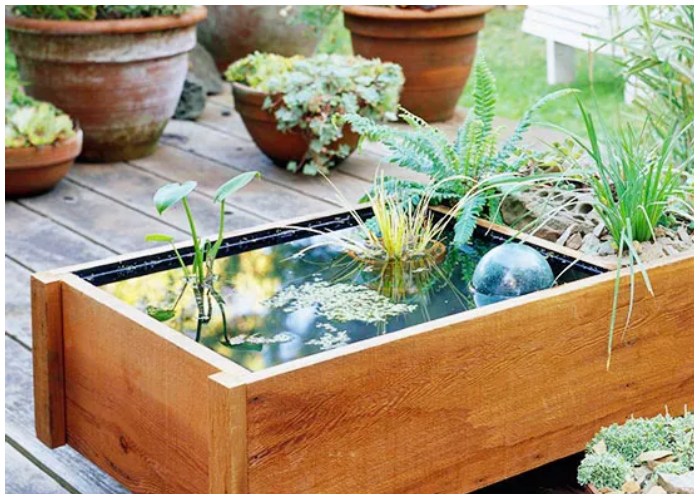
A beautiful water garden can bring peace and tranquility to any outdoor space, but what do you do if you’re short on room? That’s where a DIY pond box comes in! Perfect for small spaces like balconies, patios, or decks, this easy-to-build project allows you to enjoy the serenity of a water feature without needing a large garden.
Whether you’re a seasoned DIY enthusiast or just getting started, this mini water garden project is a creative and practical solution for adding a calming aquatic element to your home. With a few simple materials, you can create a stunning water feature filled with lush plants, decorative elements, and even a few fish. Follow these steps to build your very own pond box and transform your small outdoor space into a peaceful oasis.
What You’ll Need
- 15 feet of 1×8 cedar boards
- Handsaw or circular saw
- Drill
- Wood screws
- Scrap wood (for corner support)
- Water sealant (safe for aquatic life)
- Plastic liner (optional for added water protection)
- Water plants (duckweed, dwarf cattails, etc.)
- Potting soil
- Pea gravel or landscape rocks
- Decorative items (gazing ball, stones, or other ornaments)
Step 1: Cut the Boards
Begin by cutting the wood for your pond box. For this, you will need:
- Two 30-inch boards for the longer sides
- Two 15-inch boards for the shorter ends
Once the wood is cut, these pieces will form the outer frame of your pond box.
Step 2: Assemble the Box Frame
Using wood screws, assemble the four cut boards into a rectangular frame. Measure the interior dimensions of the frame and cut boards to fit the base of the box. Secure the base to the frame by drilling wood screws every 6 inches along the edges to ensure a sturdy structure.
Step 3: Add a Divider
To create space for both plants and water, cut a divider to fit inside the box. You’ll want to allocate approximately one-third of the box for planting and the other two-thirds for the pond. Secure this divider inside the box using screws, ensuring it’s tightly in place to keep soil and water separate.
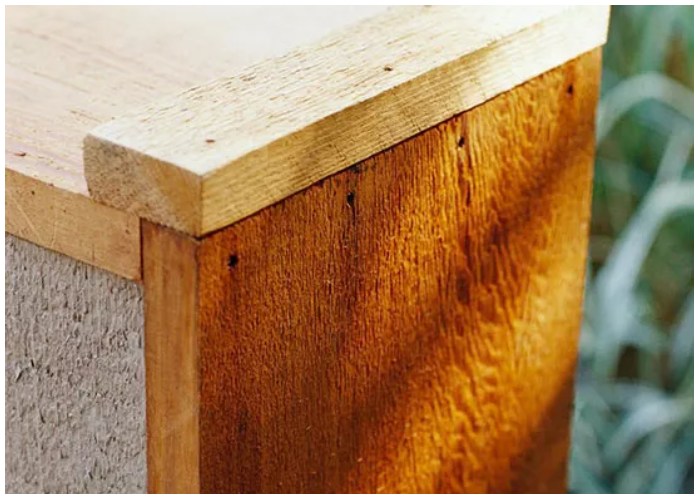
Step 4: Reinforce the Corners
For added strength and durability, cut four pieces of 1×2-inch scrap wood. Apply a water sealant to one side of each piece. Once dry, attach the pieces—sealant side down—into each corner of the box to provide extra support.
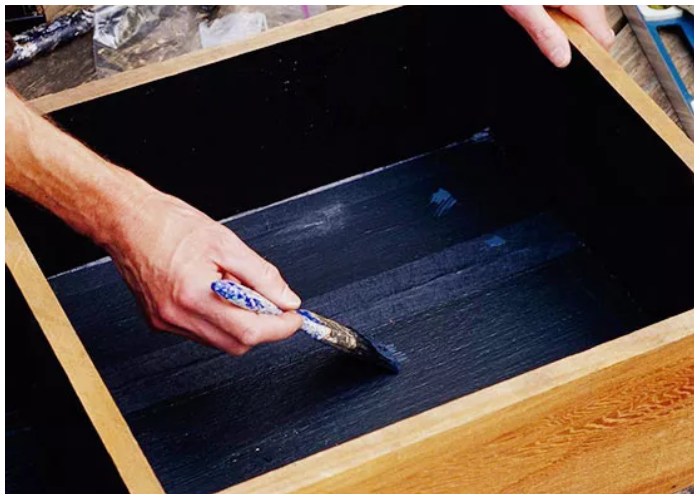
Step 5: Apply Sealant or Liner
Now it’s time to waterproof your pond box. Inside the box, you can either install a plastic liner or apply a water sealant. Make sure the sealant is safe for aquatic life, as it will come into direct contact with water and plants. Apply an extra coat of sealant on both the pond and planter sides. In the planter section, drill three drainage holes at the bottom.
Step 6: Add Water and Plants
With your pond box built and sealed, you can now add the finishing touches. Fill the planter section with potting soil and plant a mix of ferns, grasses, or your favorite greenery. For the pond, add water along with floating plants like duckweed or potted dwarf cattails. You can even introduce small fish if you’d like.

Step 7: Decorate and Enjoy
Once your water garden is complete, add decorative touches such as a gazing ball or small stones to enhance the look. Then sit back, relax, and enjoy the serene beauty of your DIY pond box as it brings the calming presence of nature to your space.
This mini water garden is not only a charming addition to any outdoor area but also a rewarding DIY project that’s easy to maintain and enjoy for seasons to come!