If you’re delving into the world of DIY and seeking practical solutions for home projects, you’ve come to the right place. Today, we’re tackling the cluttered chaos of the garage by building functional and affordable garage cabinets. This project not only enhances your space but also keeps your tools, materials, and other garage essentials neatly organized. Let’s transform your garage into a well-ordered workshop without breaking the bank.
1. Start with a Clean Slate
Embarking on any organizational project requires a clear canvas. My garage was no exception; it was a repository for leftover materials, tools, and remnants from previous homeowners. The first step was to clear out the space entirely, which set the stage for a fresh start and allowed me to visualize the potential of my garage workshop.
2. Plan the New Space
Efficiency and cost-effectiveness were my primary goals for this project. I aimed to create ample storage without major expenses. The project centered around constructing a large, corner cabinet tailored to the dimensions of the existing space and the storage needs. This approach ensured that the new storage solution would seamlessly integrate with the current setup.
3. Install Plywood on the Studs
My garage, like many others, lacked drywall and exposed the bare studs. Before crafting the cabinets, I covered the studs with plywood for a smoother foundation. Utilizing OSB (Oriented Strand Board) panels left over from previous projects provided a cost-effective way to prep the area for cabinet installation.
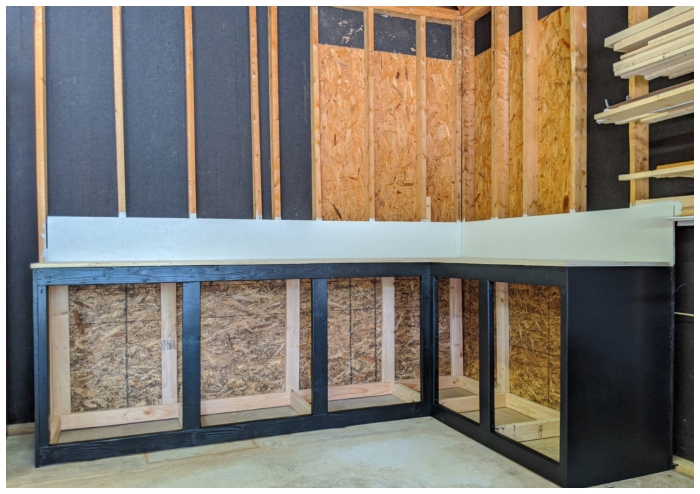
4. Build the Cabinet
The cabinet’s frame was constructed from economical 2x4s, with plywood serving as the material for the doors, sides, and top. I began with the base, ensuring it was deep enough to accommodate the items I planned to store, then built a matching top frame. Vertical supports connected the two frames, creating a sturdy structure for the cabinet.
5. Cut and Install Counter Top and Cabinet Ends
For the countertop, I repurposed a piece of 3/4″ whitewood plywood. Although it was not my first choice for staining, its availability made it a practical option. I cut the plywood to extend slightly over the edge of the cabinet frame, providing a clean, finished look. Before securing the countertop, I painted the visible OSB sections and covered the cabinet ends with 1/4″ plywood for a polished appearance.
6. Paint the Cabinet Frame
To maintain low costs, I used leftover semi-gloss black paint for the cabinet frame. Painting before installing the doors simplified the process, ensuring a neat finish without the need to maneuver around the doors.
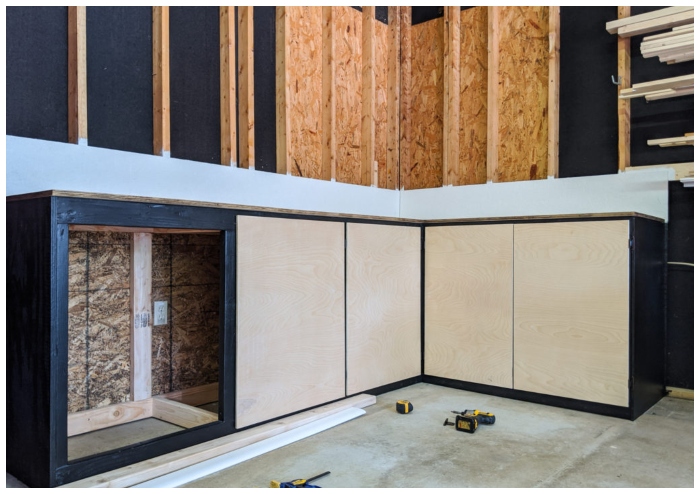
7. Make and Install Cabinet Doors
The doors, crafted from 1/2″ birch plywood, were designed to be overlay doors to conceal any imperfections in the frame construction. This choice not only provided aesthetic benefits but also ensured the doors were lightweight and functional. Each door was sized generously to allow easy access to stored materials.
8. Stain or Paint the Counter Top
Initially, I attempted to stain the whitewood plywood countertop, but the result was uneven and unsatisfactory. Opting for a black paint finish ultimately provided a more cohesive and attractive look, despite my preference for a stained surface to minimize the appearance of sawdust.
9. Stain Cabinet Doors
The birch plywood used for the cabinet doors stained beautifully, offering a natural, clean look that contrasted nicely with the black frame. This choice not only enhanced the aesthetic but also reduced the visibility of dust and debris, which is inevitable in a garage workshop.
10. Seal the Cabinet and Counter Top
To protect both the cabinet and the countertop from wear and tear, I applied two coats of polycrylic sealant. This clear finish preserved the beauty of the stained doors and painted surfaces while providing a durable layer of protection against scratches, stains, and moisture.
Conclusion
By following these steps, I was able to transform a cluttered garage into a functional workshop with ample storage. This project demonstrates that with some creativity, basic carpentry skills, and a willingness to repurpose materials, you can achieve a practical and aesthetically pleasing outcome on a budget. Whether you’re a seasoned DIYer or just starting, building your own garage cabinets is a rewarding project that enhances your workspace and supports your creative endeavors.