Creating a folding mobile workbench is an excellent endeavor for DIY enthusiasts who need a space-efficient and versatile workspace. This guide provides detailed instructions for constructing a robust, foldable workbench that occupies only 7 inches of space when not in use, making it ideal for tight spaces in home garages or workshops.
Introduction: Maximizing Your Workspace
A folding mobile workbench is not only practical but also customizable to fit various workspace environments. Its compact design, when folded, makes it perfect for those who require a temporary, sturdy work surface that can be stored away easily. With a commitment of just a few hours and some basic construction materials, you can create a valuable addition to your workspace.
Tools and Materials Needed
Before beginning your project, gather the necessary tools and materials to ensure the construction process goes smoothly:
Tools Required:
- Drill/driver for fastening screws and hinges.
- Jigsaw for cutting notches and curves.
- Miter saw for precise crosscuts.
- Circular saw or table saw for ripping boards to the correct width.
Materials Required:
- 1-3/4″ construction screws for sturdy assembly.
- 1×4 pine boards for framing.
- 2×4 pine boards, totaling 30 feet, for structural supports.
- 3″ construction screws for enhanced frame security.
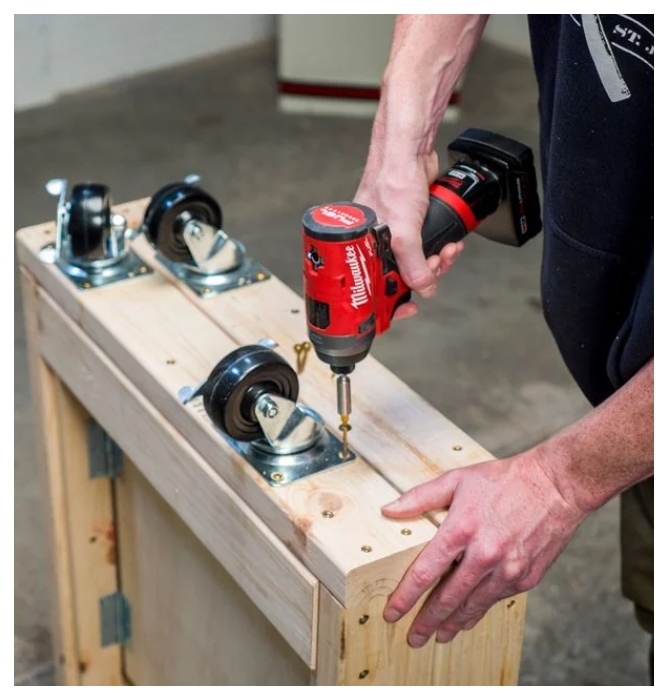
- Four 3″ locking swivel casters for mobility.
- Eight 3” butt hinges for folding mechanisms.
- One 4′ x 8′ sheet of 3/4″ plywood for the workbench surface.
- Four 5″ strap hinges to secure the folding parts.
- Two hook-and-eye latches to keep the bench secure when not in use.
- Wood glue to reinforce joints.
Step-by-Step Building Instructions
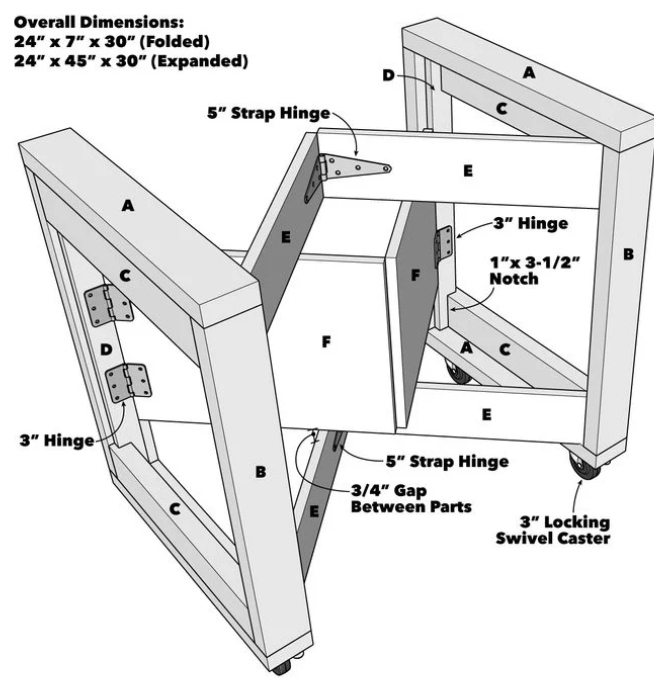
Step 1: Construct the End Frames Begin by assembling the frame that forms the base of your workbench. Connect the frame rails (A) to the frame stiles (B) using wood glue and screws, creating a rectangular frame. Secure the fixed supports (C) inside the frame stiles to stabilize the structure.
Step 2: Prepare and Attach Mounting Strips Modify the 1×3 boards to create mounting strips (D) by ripping them to 2 inches wide and cutting them to the length specified in your design. Use a jigsaw to notch the ends to accommodate the frame stiles. Attach these strips inside the frame stiles using wood glue and screws. These strips will support the folding mechanism.
Step 3: Install the Folding Supports Position the folding support arms (E) onto the mounting strips (D), securing them with butt hinges. This setup allows the arms to fold flat against the frame rails, essential for converting the workbench into its compact form. Ensure all moving parts operate smoothly and adjust as necessary.
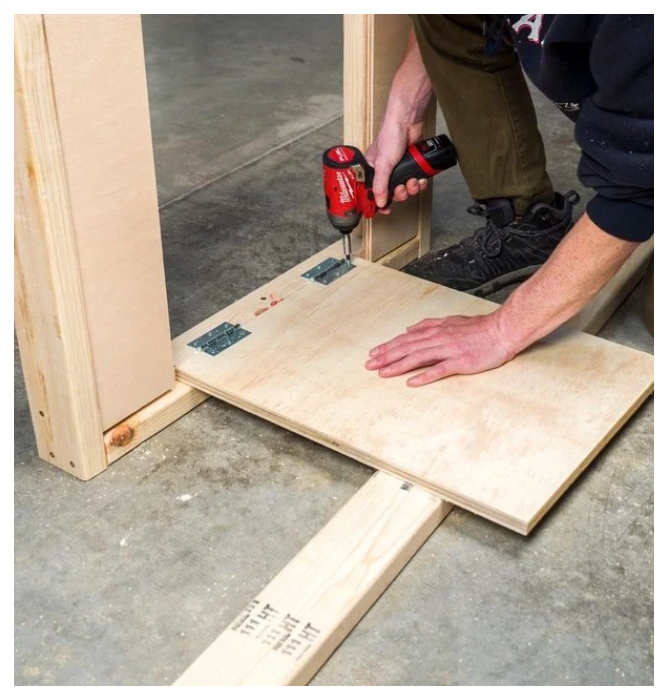
Step 4: Join the Two Frames With the folding supports in place, align and clamp the support arms and panels, ensuring they are correctly positioned. Use strap hinges to join the two main frames securely, checking for ease of movement and proper alignment.
Step 5: Secure the Structure Install hook-and-eye latches on the outer faces of the frame stiles to keep the workbench securely folded when not in use. Test the locking mechanism by closing and latching the assembly, then reopening it to ensure stability.
Step 6: Assemble the Bench Top Secure the bench top (G) to the top rails (H), spacing them 5 inches from the ends of the plywood top for optimal support and balance. This step is crucial as it provides a durable and stable work surface for various projects.
Step 7: Add Mobility Features Finally, attach the locking swivel casters to the base of the frame rails. Position the casters so that they do not interfere with each other when rotating, ensuring smooth mobility across different surfaces.